


How to Grow Cannabis at Home: A Seedsman’s Complete Guide

This guide covers how to grow cannabis at home step by step, with practical tips from James Bean and the Seeds Here Now team for adult growers 21+.
I’m James Bean. I’ve run Seeds Here Now for 16 years, and in that time I’ve talked to thousands of first-time growers. I can usually tell within two minutes whether someone’s first grow is going to succeed or fail—and it almost never comes down to lights, nutrients, or tents.
It comes down to the seed.
Every generic grow guide on the internet starts with “set up your grow space.” That’s backwards. Your grow space can’t fix bad genetics. Your nutrients can’t fix bad genetics. Nothing downstream fixes what you planted. A grow is a four-month commitment, and the single decision that determines your ceiling happens before you ever touch a light switch.
So this guide starts where your grow actually starts: with genetics. Then we’ll walk through germination, environment, veg, flower, harvest, and drying and curing—everything you need to take a seed to a jar of smokable flower. No filler. Let’s go.
Step 1: Genetics Decide Everything
Here’s the part nobody selling grow tents will tell you: two growers can run identical setups—same light, same soil, same feed schedule—and one pulls dense, frosty, potent flower while the other pulls airy, harsh mids. The difference is the seed.
Genetics set the hard limits on everything you care about:
- Potency. A plant’s THC ceiling is written in its DNA. You can grow a 12% strain perfectly and it will never hit 25%. You cannot feed your way past genetics.
- Yield. Structure, branching, flower density—all genetic. Training helps you reach a plant’s potential; it doesn’t raise the potential.
- Stability. Well-bred seeds grow predictably. Poorly bred seeds throw surprises: hermaphrodites, wildly different plants from the same pack, weak germination.
- Difficulty. Some strains shrug off humidity swings and nutrient mistakes. Others fold the first time you overfeed. As a beginner, you want forgiving genetics, and that’s a breeding trait.
Why Bagseed Wastes Four Months of Your Life
The most expensive seed in the world is the free one you found in a bag.
Bagseed exists because something went wrong—usually a stressed plant that hermaphrodited and pollinated itself. That means your free seed carries a genetic tendency toward herming. You’ll spend four months watering, feeding, and checking that plant daily, and somewhere in week five of flower it can throw pollen sacs and seed your entire crop. Or it turns out to be male. Or it grows into something that resembles the bud it came from about as much as you resemble your great-grandfather.
Run the math. A home grow costs you roughly 16 weeks of daily attention, plus electricity, plus nutrients, plus your patience. Against all that, the $60–$120 you’d spend on a pack of professionally bred seeds is the cheapest insurance in the entire hobby. I’ve watched too many first-timers quit growing forever because their bagseed grow ended in seeded, hermied disappointment. Don’t be that grower.
Buy From Stable Breeders, Not Random Seeds
A real breeder works a cross for generations—selecting parents, testing offspring, culling the junk—before a seed ever reaches you. A “pollen chucker” crosses two plants once, names it something catchy, and sells the untested result.
You can’t always tell from the packaging, so here’s how I vet breeders after 16 years of doing exactly that for a living:
- Track record. How long have they been breeding? What have they released that people still grow five years later?
- Documented lineage. A serious breeder tells you the parents and the generation (F1, F2, S1, BX). Vague lineage is a red flag.
- Community results. Grow reports from real growers, not just glamour shots from the breeder’s own account.
- Reputation for stability. Ask around. Herm-prone lines get talked about fast.
This is honestly the biggest reason seed banks like mine exist. We’ve grown these lines, we know which breeders test their work, and we drop the ones who don’t. Curation is the product.
Regular vs. Feminized vs. Autoflower: Pick the Right Tool
This is the second genetics decision, and beginners get it wrong constantly.
Regular seeds produce roughly 50% males and 50% females. Only females produce the flower you smoke. Regular seeds are the right choice for breeders and pheno hunters—they’re the raw material of the craft. They are usually the wrong choice for a first grow, because you’ll need to identify and cull males in early flower, and half your germinated seeds won’t make it to harvest.
Feminized seeds are bred to produce ~99% female plants. Every seed you pop is a plant you harvest. “Photoperiod” means the plant flowers when you switch its light schedule—which puts the timeline in your hands.
Autoflower seeds flower automatically based on age, not light schedule, and finish seed-to-harvest in roughly 8–11 weeks. The trade-offs: smaller plants, smaller yields, and no recovery time—because autos run on a fixed clock, a stunted week one is a stunted harvest. They’re great for tight spaces, impatient growers, and outdoor growers in short seasons. They’re less forgiving of early mistakes than people claim.
My recommendation for a first grow: one or two feminized photoperiod plants of a forgiving, well-bred strain. Fewer plants means you actually pay attention to each one, and photoperiod means your mistakes can be recovered from by simply vegging longer.
Phenotype Variation: Why Your Plant Isn’t a Clone of the Photo
One more concept, because it saves you confusion later: seeds are not clones. Every seed in a pack is a sibling, not a twin. They share parents but express different combinations of traits—this is phenotype variation. Pop three seeds of the same strain and you may get one tall and stretchy, one short and bushy, one somewhere between, with different smells and finishing times.
Well-bred, worked lines (F4, F5, and beyond) show tighter variation. Fresh F1 crosses from an untested chucker can be all over the map. This is another reason breeder selection matters: you’re paying for consistency. And it’s why serious growers “pheno hunt”—popping a full pack to find the standout plant worth keeping. As a beginner, just know that some plant-to-plant difference is normal genetics, not something you did wrong.
Get the genetics right and everything that follows gets easier. Now let’s grow the thing.
Step 2: Germination
You paid for good seeds—don’t kill them on day one. Germination is simple: seeds need moisture, warmth, and darkness. That’s it.
The paper towel method is what I recommend, because you can see what’s happening:
- Wet two paper towels so they’re damp, not dripping.
- Place seeds between them, then slide the towels between two plates to hold moisture and block light.
- Keep them warm—75–80°F is the sweet spot. Top of the refrigerator works; a seedling heat mat works better.
- Check daily. Most viable seeds crack and show a taproot in 24–72 hours. Some take up to a week. Don’t give up early.
- When the taproot hits about a quarter to half an inch, plant it taproot-down, about a half inch deep, in lightly moistened starter medium.
Handle sprouted seeds gently—tweezers or clean fingers, and never touch the taproot itself. Alternatively, plant seeds a half inch deep directly in moist medium and keep it warm; you lose visibility, but you also skip the risky transfer.
Seedling stage basics: high humidity (65–70%), gentle light (a quality LED dimmed and raised, or a simple T5), and restraint with water. The number one seedling killer I hear about is drowning—beginners love their plants to death. Water lightly in a small circle around the stem, then let the top of the medium dry before watering again. Roots grow by searching for water. Let them search.
No nutrients yet. The seed carries its own food for the first week or two. Start feeding at quarter strength once you see the second or third set of true (serrated) leaves.
Step 3: Environment and Setup
You don’t need a NASA clean room. You need a small, controllable space and a decent light. Here’s the honest minimum for a two-plant indoor grow:
- A 2×4 grow tent. Reflective, light-proof, with ports for ventilation. This size fits in a closet and yields more than most beginners expect.
- A quality full-spectrum LED. This is where your equipment money goes. A real 200–300W LED from a reputable lighting brand beats a $60 burple-colored mystery light every time. Cheap lights are the equipment version of bagseed.
- An inline exhaust fan with carbon filter. Pulls hot, humid air out, keeps fresh CO2 coming in, and handles smell. Non-negotiable.
- A small oscillating fan. Gentle airflow strengthens stems and prevents the stagnant pockets where mold starts.
- Fabric pots, 3–5 gallon. They air-prune roots and make overwatering harder.
- A thermometer/hygrometer and a pH pen. The two cheapest tools with the biggest payoff.
Medium: For a first grow, use a quality soil or a soil/coco blend built for cannabis. A good amended soil buffers your mistakes and can carry a plant weeks with just water. Hydro yields faster growth but punishes errors within hours instead of days. Learn in soil, graduate later if you want.
Targets to hold: 70–85°F lights-on, no more than a 10-degree drop lights-off. Humidity around 60% in veg, tapering to 40–50% in flower. Water pH at 6.0–6.8 in soil (5.5–6.5 in coco/hydro). Off-target pH silently locks nutrients away from the roots—half the “deficiencies” beginners chase are actually pH problems.
Know your local plant counts and rules before you germinate anything.

Step 4: The Vegetative Stage
Veg is when your plant builds the frame that will carry your harvest. Under 18 hours of light per day, a photoperiod plant just grows—stems, fans, roots. It will keep vegging as long as you hold that schedule, and this is your superpower as a photoperiod grower: you decide when flower starts. Plant looking small or recovering from a mistake? Veg another week or two. Autos don’t give you that grace.
What matters in veg:
- Watering rhythm. Water thoroughly until slight runoff, then wait until the pot feels light and the top inch is dry. Wet-dry cycles build roots. A daily-watered soil plant is usually a drowning plant.
- Feeding. Nitrogen-forward veg nutrients at half the label’s recommended strength. Nutrient companies sell nutrients; their charts run hot. Raise the dose only if the plant asks—pale, lime-green growth means hungry. Dark, clawing, burnt-tipped leaves mean overfed.
- Training. Learn one technique your first grow: low-stress training (LST). Gently bend and tie down the main stem so the plant grows flat and wide instead of tall and pointed. Every side branch that reaches the light becomes a top instead of larfy undergrowth. Ten minutes of LST does more for yield than any bottle of “bloom booster” ever sold. Add a top (snipping the main growth tip above the 4th–5th node) if you’re feeling confident; it splits one main cola into two and slows vertical stretch.
Give a plant 4–8 weeks of veg depending on your space. Remember it can double in size during early flower—flip before it outgrows your tent, not after.
Step 5: The Flowering Stage
Flip your timer to 12 hours on, 12 hours off, and the plant thinks autumn has arrived. Within two weeks you’ll see white pistils; over the next 7–10 weeks (strain-dependent—another thing your breeder’s documentation tells you) those become the buds you’re here for.
Flowering rules:
- Protect the dark period like it’s sacred. Light leaks during the 12 hours of darkness stress the plant, and stress is how even good genetics get pushed toward herming. Seal tent pinholes, cover indicator LEDs, don’t open the tent during dark hours.
- Drop the humidity. As buds thicken, they become mold hotels. Get RH down to 40–50% and keep air moving. Botrytis (bud rot) can take your best cola from the inside out in days.
- Shift the feed. Flowering plants want less nitrogen and more phosphorus and potassium. Switch to a bloom formula, still starting at half strength.
- Expect the stretch. Most strains gain 50–100% height in the first three weeks of flower. This is genetic and normal. Keep the light at its proper distance as they climb.
- If you ran regular seeds, sex your plants now. Males show small pollen balls at the branch joints within the first two weeks of flower; females show wispy white hairs. Remove males immediately unless you want seeds.
Then, mostly, leave them alone. Late flower is a patience game, and fiddling causes more harm than help.

Step 6: Harvest Timing
Harvesting too early is the most common way beginners shrink a good harvest. Those last two weeks are when buds pack on density and potency—don’t let excitement cost you 25% of your yield.
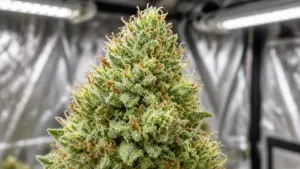
Forget guessing by the calendar alone. Get a cheap 60x jeweler’s loupe and look at the trichomes—the frosty resin glands on the buds:
- Clear trichomes: too early. Potency still building.
- Mostly cloudy/milky: peak THC. Energetic, potent effect. This is the window most growers want.
Pistils help as a backup check—wait until 70–90% have darkened and curled—but trichomes are the truth. When you’re in the window, cut the plant, and move straight into the stage beginners most often ruin.

Step 7: Drying and Curing
Hear me on this: you can grow perfect flower and destroy it in the last two weeks. Drying and curing aren’t an afterthought—they’re where harshness leaves and flavor develops. Rushed, hot drying is why homegrown gets a bad reputation.
Drying: Hang branches upside down in a dark space at roughly 60°F and 60% humidity with gentle indirect airflow for 7–14 days. Slow is the goal. A bud dried crispy in three days in a warm closet will smell like hay and smoke harsh, permanently—the chlorophyll never got a chance to break down. Branches are ready when small stems snap instead of bending.
Curing: Trim the dried buds and seal them in glass jars, filled about three-quarters. For the first two weeks, open each jar for a few minutes daily (“burping”) to release moisture and refresh the air. Then burp every few days. Two weeks of curing makes good flower; four to eight weeks makes flower that embarrasses most dispensary shelves. Two-way humidity packs (62%) in the jars make this nearly foolproof.
If buds feel moist or smell like fresh-cut grass when you open a jar, leave the lid off for an hour—jarred wet buds mold fast.
The Beginner Mistakes That Kill First Grows
Sixteen years of customer conversations, condensed:
- Starting with bagseed or gas-station genetics. The four-month mistake. Covered above. Number one for a reason.
- Overwatering. More seedlings drown than starve. Let pots dry between waterings.
- Overfeeding. Half strength, always, until the plant tells you otherwise. Nutrient burn is self-inflicted.
- Ignoring pH. The invisible problem behind most “mystery deficiencies.” A $20 pen ends it.
- Cheap lights. Genetics set the ceiling; light is the biggest environmental factor in how close you get to it.
- Flipping to flower too late. Plants double in early flower. Measure your tent, do the math.
- Harvesting early and drying fast. The one-two punch that turns a great grow into mediocre smoke. Patience at the end is free yield and free quality.
FAQ
Autoflowers compress that to about 3–4 months. Anyone promising quality flower dramatically faster is selling something.
How much will one plant yield?
A well-grown feminized photoperiod plant in a 3–5 gallon pot under a proper LED typically yields 2–6 ounces dried. Genetics, light quality, and veg time drive the range. Autoflowers usually land at 1–3 ounces.
Are feminized or autoflower seeds better for beginners?
Feminized photoperiod seeds, in my opinion. They yield more and—more importantly—they forgive mistakes, because you can extend veg while a plant recovers. Autos run on a fixed clock, so early stumbles are permanent.
Why did my plant grow differently from the strain photos?
Phenotype variation. Seeds are siblings, not clones—each expresses the parents’ traits differently. Tightly worked lines from established breeders vary less; untested crosses vary more. It’s also why buying from stable breeders matters: you’re paying for predictability.
Can I just grow the seeds I found in my bag?
You can, and you’ll probably regret it. Bagseed usually comes from a stressed, hermaphroditic plant, which means unknown genetics with a built-in tendency to herm and seed your crop. Weigh four months of your time against the price of a proven pack. It’s not close.

Start With the Seed
Everything in this guide matters, but nothing matters more than what you put in the ground. Lights get upgraded, techniques get learned, mistakes get forgiven—genetics are the one decision you can’t fix later.
That’s the entire reason I built Seeds Here Now: 16 years of stocking verified, stable genetics from breeders who actually work their lines, so your four months of effort start from a foundation that can’t fail you. Browse our feminized seeds for the smoothest first grow, autoflowers if speed is your thing, or regular seeds when you’re ready to hunt phenos like the rest of us degenerates.
Got questions about which strain fits your space and experience? Reach out—I answer these emails personally. Now go pop something worth growing.
— James Bean, Seeds Here Now
How to grow cannabis at home: Further Reading
For more on how to grow cannabis at home, these related Seeds Here Now guides go deeper: grow your own cannabis at home, grow marijuana at home in 60 days, Blue Dream grow guide. For background reading, see Cannabis cultivation (Wikipedia).
To put this into practice, browse our feminized cannabis seeds, autoflower seeds, cannabis clones. Every listing names the breeder and lineage so you can match the genetics to your space and your goals.
Suggested Articles

 12 Nov 2026
 11 min read
;)
;)
;)
 January 12, 2024


RESPONSES (0)
No responses yet. Be the first to respond!