Hey, it’s James Bean, and I know you’re ready to dive into outdoor growing with THC-A seeds. You’re probably curious, maybe a bit nervous about what it takes to grow strong plants outside, especially with the unique hurdles that come up along the way. Don’t worry—I’ll walk you through everything, keeping it simple and straightforward. […]
How To Germinate Pot Seeds: A Simple and Effective Method
If you’re new to the cannabis-growing game, learning how to germinate pot seeds might seem daunting. After all, these seeds can often be pretty pricey! But don’t worry, we’ve got you covered with a simple and effective method that will have you growing like a pro in no time.
Germinating marijuana seeds is the first step in creating a thriving cannabis garden. Whether you’re an experienced gardener or a curious novice, it all starts with seed germination. Our method is easy to follow and requires minimal equipment, making it perfect for anyone looking to grow their own stash from scratch.
Key Takeaways
- Germinating marijuana seeds is the first step in creating a thriving cannabis garden
- Our method is simple, effective, and requires minimal equipment
- Anyone can learn how to germinate pot seeds and grow their own stash from scratch
The Importance of High-quality Pot Seeds
Let’s be real here, folks. Your pot seeds are the foundation of your entire cannabis-growing operation. It’s like building a house: if you have a shaky foundation, the whole thing is going to come tumbling down.
That’s why it’s absolutely essential that you invest in high-quality seeds from reputable sources. Sure, you could try to save a few bucks by buying seeds from some sketchy website, but you’re just asking for trouble.
Luckily, there are some fantastic online seed banks out there that offer top-notch genetics and reliable shipping. One of our personal favorites is Seeds Here Now, which consistently receives rave reviews from satisfied customers.
Do yourself a favor and don’t skimp on the seeds. It’ll save you a ton of frustration and disappointment in the long run.
Gathering the Necessary Supplies
Before jumping into the exciting world of pot seed germination, it’s important to gather all the essential supplies. You don’t want to be caught unprepared mid-germination and end up with a weed-less garden!
So, what do you need? Here’s a handy checklist:
Item | Quantity |
---|---|
Potting soil | 1 bag |
Containers | As many as you need |
Watering can | 1 |
Seeds | As many as you want to germinate |
Plastic wrap | 1 roll |
Labels | 1 pack |
Heat mat (optional) | 1 |
Once you’ve gathered all your supplies, you’ll be ready to dive into the exciting world of pot seed germination!
Preparing the Pot Seeds for Germination
So, you’ve got your hands on some premium pot seeds and you’re itching to start your cannabis cultivation journey. But before you get started, it’s crucial to properly prepare your seeds for germination to give them the best chance at successful growth. Let’s get into it!
Step 1: Soak Those Seeds
Before you start germinating, you’ll want to soak your seeds to help break down the tough outer shell and promote healthy growth. Simply place your seeds in a glass of room-temperature water, making sure they’re fully submerged, and let them sit for 12 to 24 hours. After soaking, remove the seeds and gently pat them dry with a paper towel (careful not to damage the seeds).
Step 2: Scarify Your Seeds (Optional)
In botany, scarification refers to the process of gently scratching the surface of a seed to encourage faster germination. You can do this by gently rubbing the seed with sandpaper or using a nail file to create small nicks in the shell. This is not necessary for all seeds, but can be helpful for older or harder ones.
Step 3: Select Your Germination Method
There are a few different methods for germinating pot seeds, including the paper towel method and the direct soil method. The paper towel method involves placing your seeds between two damp paper towels and keeping them in a dark, warm place until they sprout. The direct soil method involves placing your soaked seed directly into your potting soil and keeping it moist until it sprouts. Choose the method that works best for you and your growing environment.
Remember, happy seeds lead to happy plants!
Germination Techniques: Paper Towel Method
Are you ready to start germinating your pot seeds? Let’s dive into the paper towel method! Not only is it a simple and effective way to sprout your seeds, but it’s also a great way to keep track of their progress.
To get started, gather your supplies and follow these easy steps:
- Take a small plate or dish and wet it down with water.
- Take a paper towel and moisten it with water until it’s damp but not soaking wet.
- Place your pot seeds on the moist paper towel and cover them with another damp paper towel.
- Place the covered seeds on the wet plate or dish and cover it with a plastic lid or wrap to keep it moist.
- Place the plate in a warm, dark place (such as a closet or cupboard) and check it every day to make sure the paper towel stays damp.
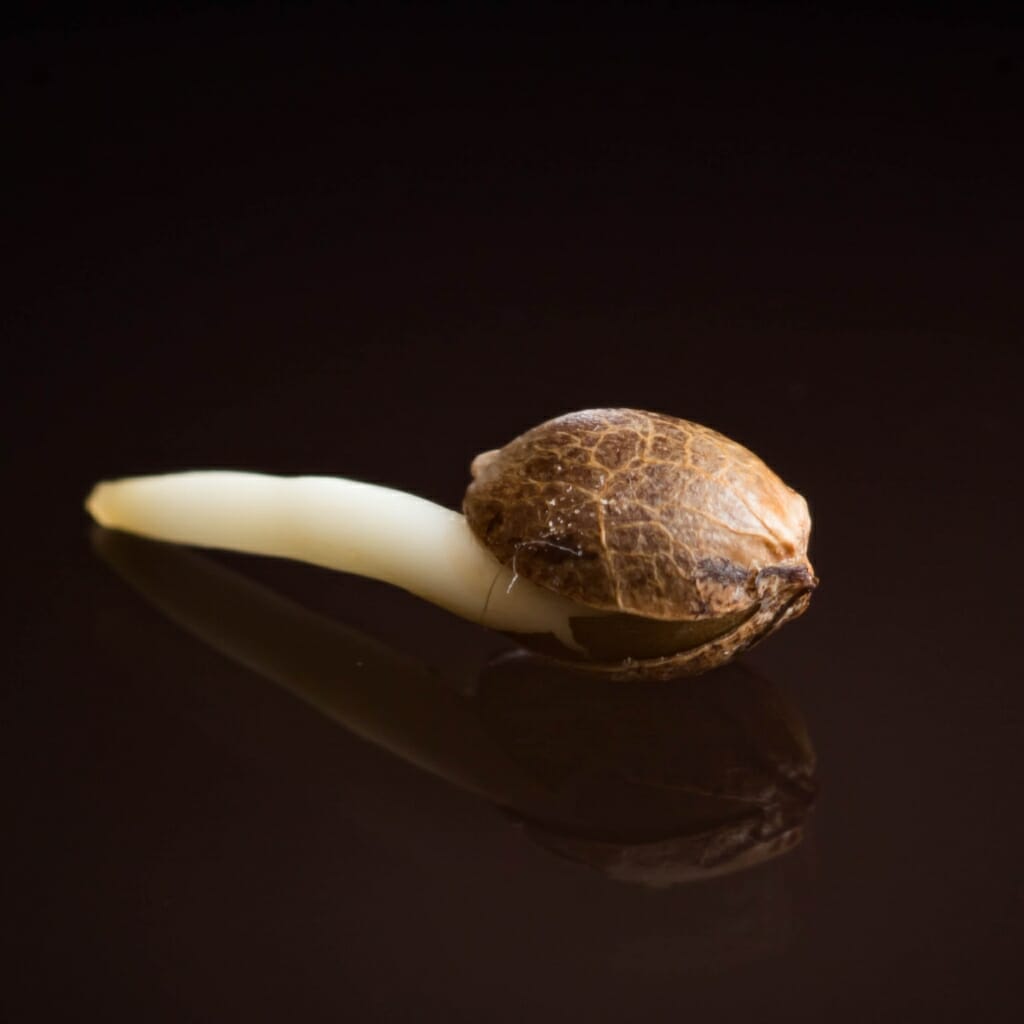
- After a few days, your pot seeds should start to sprout. Once they reach about half an inch in length, they’re ready to be planted in soil.
Pro tip: If you’re having trouble keeping the paper towel moist, try using a spray bottle to mist it with water.
Remember, patience is key when germinating pot seeds. Don’t get discouraged if they don’t sprout right away; it can take up to several days for them to start growing.
The paper towel method is a tried-and-true technique for sprouting seeds, so don’t be afraid to give it a try! And the best part? You can gently lift the paper towel once in a while to track the progress of your seeds.
Germination Techniques: Direct Soil Method
Feeling like taking the all-natural route? The direct soil method might be just the thing for you. This technique eliminates the need for transplanting, allowing your seeds to go straight from germination to their final home in the soil—just like skipping the middleman, but for plants.
First things first, prep the soil. You’ll want a light and airy medium, allowing for easy root development. Avoid heavy soils or those containing high levels of nutrients, as they can burn the delicate roots. Most premade seed-starting soil mixes should fit the bill. Once you’ve filled your pots with soil, make small holes in the surface of the soil, about an inch deep, and place a seed in each hole. Cover them up lightly with soil and moisten gently, taking care not to overwater.
Next, create a cozy environment for your seeds to sprout in. Cover the pots with plastic wrap, making sure it’s nice and snug. Poke a few holes in the wrap to allow for airflow, and place the pots in a warm, bright location. A sunny windowsill or under a grow light should do the trick.
As always, keep a close eye on your little ones. Make sure the soil stays moist but not waterlogged, and adjust the temperature as needed. Once the first pair of leaves appear, it’s time to remove the plastic wrap and give your seedlings some fresh air.
With the direct soil method, you’ll be reaping the benefits of nature’s ultimate recycling system in no time. Just remember to stay patient—good things come to those who wait (and take good care of their seeds).
Caring for Germinating Pot Seeds
So, you’ve successfully germinated your pot seeds using one of the techniques described in the previous sections. Congratulations! But, don’t pop that champagne bottle just yet. The real work has just begun.
It’s essential to provide your baby seedlings with the utmost care to ensure healthy growth and development. Here are some best practices to keep in mind:
- Keep it warm: The ideal temperature for seedlings is between 70 and 85 degrees Fahrenheit. Invest in a heating mat or place them in a warm area, but not too close to a direct heat source.
- Humidity is key: Seedlings love a humid environment, so keep the humidity level between 60 to 70 percent. You can use a humidifier or cover the plants with a clear dome.
- Watering: Seedlings need to be kept evenly moist, but not soaking wet. Water them lightly as needed, taking care not to oversaturate the soil.
- Lighting: Seedlings require plenty of light to grow strong and healthy. If using artificial light, keep it two to three inches above the plants and provide 18 to 24 hours of light per day.
Remember, these tiny seedlings are counting on you for their survival! Treat them with care, and they’ll reward you with a bountiful harvest.
Troubleshooting Germination Issues
Germinating pot seeds may seem like a walk in the park, but sometimes nature has its own plans. Here are some of the most common issues that may arise during the germination process:
Problem | Solution |
---|---|
Seeds won’t germinate | Check your seed quality, ensure proper temperature and moisture levels, or try a different germination method. |
Mold growth | Reduce moisture levels, increase ventilation, and maintain proper temperature levels. If mold persists, discard the affected seeds and containers. |
Damping-off | This fungal disease can be prevented by using clean soil, sterilizing your equipment, and maintaining optimal conditions for seedling growth. |
Slow germination | Ensure proper temperature and moisture levels, and practice patience. Some seeds may take longer to germinate than others. |
Remember, prevention is always better than cure. Take the necessary steps to maintain a clean, healthy germination environment, and don’t be afraid to experiment with different techniques until you find one that works for you.
As Thomas Edison once said, “I have not failed. I’ve just found 10,000 ways that won’t work.”
Stay positive, stay curious, and enjoy the process!
How To Germinate Pot Seeds: Conclusion
Germinating pot seeds may seem daunting at first, but with the right knowledge and supplies, anyone can do it! Remember, the key to success is quality seeds and a little TLC.
Now that you know how to germinate pot seeds, it’s time to put your newfound skills to the test. Don’t be afraid to experiment with different methods and techniques to find what works best for you.
With patience and persistence, you’ll soon be rewarded with beautiful, thriving cannabis plants that will make all your friends green with envy.
So, what are you waiting for? Let’s get growing!
FAQ
Q: How do I germinate pot seeds?
A: Germinating pot seeds is a simple and effective process. By following the paper towel method or direct-to-soil method, you can ensure successful germination and start your cannabis journey on the right foot.
Q: Why is it important to use high-quality pot seeds?
A: Using high-quality pot seeds is crucial for successful germination. Purchasing from reputable sources such as Seeds Here Now ensures that you have the best chance of achieving healthy and vigorous plants.
Q: What supplies do I need for germinating pot seeds?
A: To germinate pot seeds, you will need essential supplies such as potting soil, containers, water, and a warm environment. Make sure to have these items ready before starting the germination process.
Q: How do I prepare pot seeds for germination?
A: Properly preparing pot seeds for germination is essential. Soak seeds, scarify them if necessary, and choose the right germination method based on your preferences to ensure successful germination.
Q: What is the paper towel method for germinating pot seeds?
A: The paper towel method is a popular technique for germinating pot seeds. It involves placing seeds between moist paper towels to encourage sprouting. Follow step-by-step instructions and helpful tips to maximize your success rate.
Q: How do I use the direct soil method for germinating pot seeds?
A: The direct soil method involves planting pot seeds directly into the medium. This technique has its advantages, and it’s important to prepare the soil, plant the seeds correctly, and create the perfect environment for optimal germination.
Q: How do I care for germinating pot seeds?
A: Proper care is essential for germinating pot seeds. Pay attention to temperature, humidity, watering, and light requirements to create an optimal environment for healthy seedling growth.
Q: What should I do if I encounter germination issues?
A: It’s common to encounter issues during the germination process. From seed viability to mold and damping-off, this section provides troubleshooting tips and solutions to ensure a successful germination experience.
Back