


Cannabis Nutrient Burn: A Complete Guide to Causes, Symptoms, Treatment, and Prevention
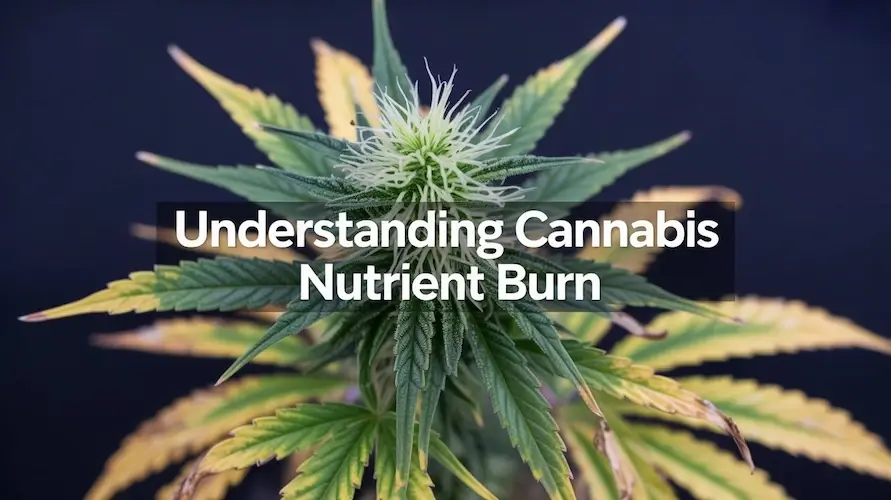
Cannabis cultivation is both an art and a science. To achieve healthy, high-yielding plants, growers must carefully balance light, water, air, and nutrients. While nutrients are essential for growth, too much of a good thing can quickly become harmful. One of the most common mistakes growers face is cannabis nutrient burn, sometimes called “nute burn.”
Nutrient burn occurs when plants absorb more nutrients than they can process, leading to tissue damage, stalled growth, and potentially reduced yields. This problem can affect soil, coco, and hydroponic grows, making it a universal challenge. Fortunately, with the right knowledge, growers can prevent, diagnose, and fix nutrient burn before it causes lasting harm.
This guide dives deep into everything you need to know about cannabis nutrient burn, including the science behind it, early and advanced symptoms, step-by-step recovery strategies, and prevention techniques for future grows.
What Is Cannabis Nutrient Burn?
At its core, cannabis nutrient burn is an overfertilization issue. When plants are given excessive amounts of mineral salts—especially nitrogen (N), phosphorus (P), and potassium (K)—the roots become overwhelmed. Instead of fueling growth, the surplus builds up in the growing medium or directly in plant tissue.
The result is nutrient toxicity. Plant cells are damaged by osmotic stress, meaning water movement within the plant becomes unbalanced. Leaves can no longer regulate moisture, resulting in the classic “burned tip” appearance.
Unlike nutrient deficiencies, which starve the plant, nutrient burn essentially poisons the plant with too much food.
Understanding the Role of Nutrients
To better understand how nutrient burn occurs, it helps to review the role of key nutrients:
-
Nitrogen (N): Crucial during vegetative growth for leaf and stem development. Too much creates dark, waxy leaves and clawing.
-
Phosphorus (P): Essential for root growth and flowering. Excess can lock out micronutrients like zinc and iron.
-
Potassium (K): Supports water uptake, bud density, and disease resistance. Overuse can cause magnesium and calcium deficiencies.
-
Calcium and Magnesium (Ca, Mg): Secondary nutrients critical for structure and chlorophyll production. Over-supplementation can cause salt buildup.
-
Micronutrients (iron, zinc, manganese, copper): Needed in small amounts. Excesses can quickly lead to toxicity.
Because cannabis is highly sensitive to its environment, even slight nutrient imbalances can trigger visible stress.
Symptoms of Cannabis Nutrient Burn
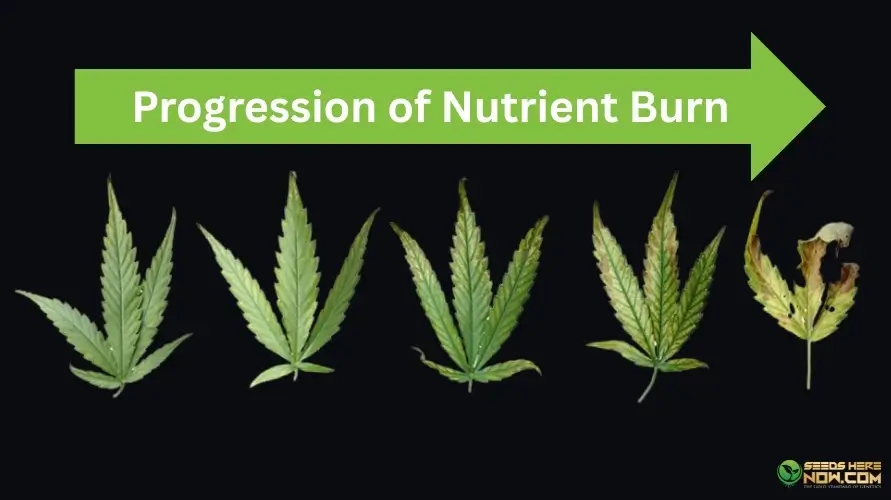
Early-Stage Symptoms
Catching nutrient burn early can save your harvest. Look for:
-
Burnt leaf tips – The very edges turn yellow, tan, or light brown.
-
Shiny, dark green foliage – A telltale sign of nitrogen overload.
-
Slight leaf curling – Often downward, known as “the claw.”
Moderate Symptoms
If not corrected, symptoms spread:
-
Brown patches across fan leaves – Especially on lower and mid-level foliage.
-
Crispy leaf texture – The affected parts dry out and crumble.
-
Slowed growth – Energy is diverted away from bud and root development.
Severe Symptoms
Advanced nutrient burn can devastate plants:
-
Widespread necrosis – Entire leaves die and fall off.
-
pH imbalance and nutrient lockout – Other deficiencies appear even though the plant has plenty of food.
-
Reduced flowering potential – Bud sites shrink, resin production drops, and overall quality declines.
Causes of Cannabis Nutrient Burn
Nutrient burn rarely happens by accident. It is almost always linked to a grower’s feeding practices, environmental factors, or product choice.
Overfeeding
The most common cause is simply giving plants too much. This often happens when growers follow the maximum recommended dose on nutrient bottles, forgetting that those instructions are often written to sell more product, not to optimize plant health.
Improper Feeding Schedules
Cannabis has different nutrient needs depending on its stage:
-
Seedlings need almost no extra nutrients.
-
Vegetative plants require higher nitrogen.
-
Flowering plants need more phosphorus and potassium, but less nitrogen.
Feeding a flowering plant a high-nitrogen veg formula almost guarantees nutrient burn.
Incorrect pH and EC Levels
If your pH is off, nutrients may not be absorbed properly. They accumulate in the growing medium, leading to salt buildup and burn. Electrical conductivity (EC) meters help monitor nutrient strength in hydroponic systems, but ignoring them can lead to overdosing.
Low-Quality or Unbalanced Nutrients
Cheap fertilizers often lack precision. They may contain excessive amounts of certain elements, overwhelming cannabis plants.
Environmental Stress
Heat, low humidity, or poor airflow force plants to drink more water, which also increases nutrient uptake. This amplifies burn symptoms even if feeding rates seem moderate.
How To Fix Cannabis Nutrient Burn
Once you spot the signs, it is crucial to act quickly. Here is a proven step-by-step recovery process:
Flush the Growing Medium
Run clean, pH-balanced water through your medium to wash away excess salts. In soil, use two to three times the container’s volume. In hydroponics, replace the reservoir with fresh, balanced water.
Reset Nutrient Levels
After flushing, avoid feeding for several days. Let the plant recover using only plain, pH-balanced water.
Resume Feeding Slowly
When reintroducing nutrients, start at half the strength of your usual mix. Observe plants closely before increasing the dosage.
Trim Severely Damaged Leaves
Remove crispy, necrotic foliage that no longer contributes to photosynthesis. However, keep partially damaged leaves, as they still provide energy.
Monitor New Growth
Healthy new leaves are a sign of recovery. If tips remain green, you are back on track. If burn continues, reevaluate feeding strength and environmental conditions.
Preventing Cannabis Nutrient Burn
Preventing nutrient burn saves time, money, and stress. Follow these best practices:
-
Start low, go slow: Begin feeding at 25% to 50% of the recommended dosage.
-
Track pH and EC: Invest in reliable meters and test regularly.
-
Use cannabis-specific nutrients: These are better balanced than generic garden fertilizers.
-
Adopt a feeding calendar: Structure feedings by growth stage instead of guessing.
-
Flush periodically: In soil and coco grows, flush every few weeks to prevent salt buildup.
-
Avoid overwatering: Let the medium dry slightly between waterings.
Organic vs. Synthetic Nutrients and Burn Risk
Organic nutrients release food slowly as microbes break them down, reducing the risk of nutrient burn. Compost teas, worm castings, and bat guano are examples of organic feeding methods.
Synthetic nutrients, while powerful and precise, deliver mineral salts directly to roots. This allows for rapid growth but greatly increases the risk of nutrient burn if mismanaged.
For beginners, organic grows may be more forgiving, while advanced growers often prefer the control of synthetic feeding—provided they monitor closely.
Long-Term Impact of Cannabis Nutrient Burn
Even after recovery, nutrient burn can have lasting consequences:
-
Yield reduction: Severe cases limit bud size and density.
-
Quality loss: Harsh smoke, altered terpene profile, and reduced aroma may result.
-
Weaker immunity: Burned plants are more susceptible to pests and mold.
This is why prevention and early correction are critical.
Frequently Asked Questions
Can I overfeed with organic nutrients?
Yes, but it is less likely since organic inputs release nutrients gradually.
Do I need to flush before harvest even without nutrient burn?
Many growers do a final flush to improve flavor and reduce harshness, especially when using synthetic fertilizers.
What Is the Difference Between Nutrient Burn and Light Burn?
Nutrient burn affects leaf tips and edges first, while light burn causes bleaching on the upper leaves closest to the grow light.
Is Nutrient Burn Reversible?
Damaged leaves will not recover, but new growth can thrive if corrected early.
Cannabis Nutrient Burn: Conclusion
Cannabis nutrient burn is one of the most common problems faced by growers, but it is also one of the most preventable. By understanding the causes, monitoring for early signs, and following proper feeding practices, you can keep your plants healthy and productive.
Always remember the golden rule: less is more. Plants thrive on balanced nutrition, not excess. With patience, observation, and proper technique, you can avoid nutrient burn altogether and enjoy robust harvests of flavorful, high-quality cannabis.
Ready to get your garden started? Shop the wide selection of regular, feminized, and autoflower cannabis seeds at Seeds Here Now.
Seeds Here Now — Est. 2009
4,500+ Strains. 110 Breeders. Ships Discreet.
We grow them, test them, and stand behind every pack we sell. Shop the full collection at Seeds Here Now:
Suggested Articles
 10 Apr 2026
  8 min read

;)
;)
;)
 September 22, 2025


RESPONSES (0)
No responses yet. Be the first to respond!